This post has been rattling around in my brain since I attended the Michigan School Improvement conference back on November 9. I think it has aged well enough now for me to get some of my thoughts down and to invite some discussion from the crowd.
The keynote speaker for the conference was Baruti Kafele. I won't spend time telling you all about who he is, other than to say he was a principal in New Jersey for over 20 years. And he carries a great message with him. If you want to learn more about him, you can go here.
Kafele's keynote address, and a subsequent break-out session that I attended, were on the topic of addressing climate and culture in our schools in order to create improvement, change, and achievement. I really connected to his definition, which he explained this way: Climate = mood; Culture = lifestyle.
He maintains that we need a mood and a lifestyle in our buildings that allow students to want to be successful. This reverberates with me, especially in my work with at-risk, struggling students. So many of my kids put on the show that it is cool to be dumb. They seem to lack drive, ambition, or motivation to work to learn. Even the students who are not "at-risk" seem much less capable of being tenacious and persevering when things get complicated. So, how can we change the mood in our school so that it is acceptable, even necessary, to be smart; where hard work is rewarding because students can see it pays off in learning; and where the pursuit of knowledge is a good thing, not something that labels you a "nerd" or a "dork" or a "teacher's pet"?
I believe it has to begin with the adults in the building. Do we live what we say we believe? Kafele, in his talk, shares a reflection that he does in the mirror daily. It is one he also teaches to his students. It involves asking three questions:
"Who am I?"
What kind of person do you really believe that you are? There is no point in lying to the mirror. Nobody else has to know. Actually, most people already have an idea of who you are. I think the key is, does their perception match yours, and is it one you want to live up to?
"What am I about...what is my purpose?"
This question gets at the heart of your belief system. You could answer this from any facet of your life...what is my purpose as a parent, a spouse, a friend, a teacher? If you see yourself as one who disseminates information, your actions are going to be different than someone who sees themselves as one who guides others in becoming learners and thinkers.
"What evidence do I have to prove it?"
I think that this question has the power to hit where it hurts and to drive us to change, if change is needed. If you hold the belief that all students can learn, what evidence do you have that proves it? If you believe that education should be student centered, what evidence do you have that proves it? If you can't come up with evidence, is there something in your practice that needs to change? How can you make a plan to initiate that change?
So I tried it, and at first it seemed a little silly to me to take the time every day to carry out this reflection. I'll admit that I don't do it every day. Somehow, just this morning, I got behind in my morning routine and was still working the curling iron in my hair when I should have been headed out the front door. But I have done the reflection enough that I can feel my thinking grow and change. Throughout the day, I will notice behaviors in myself and I will ask myself, "How does what I just did reflect who I want to be?" Sometimes I am proud of myself, knowing that I am living my beliefs. Other times I am disappointed that my actions don't match who I want to be, but those realizations are necessary in order to eliminate those behaviors and actions.
I have also begun to notice behaviors in people around me. Just this morning, a colleague of mine yelled at a student. Loudly enough that I heard it down the hall from in my office. Loudly enough that if I were that student, I'd have been a puddle of sobbing goo on the floor. Loudly enough that if it were my own child being yelled at, my Mama Bear claws would have come out in a flash. And it made me think, is that really the kind of person that teacher wants to be? Does that teacher really believe it is ok to treat students with such disrespect? How are the actions of that teacher affecting the climate and community of our entire building? And most importantly, I wonder how to open this conversation with staff in order to change the climate and community in our building so that it is a place our students, all of them, look forward to learning and growing in?
Thursday, November 29, 2012
Wednesday, November 21, 2012
Today's folder: Learning Tools
Today's app folder is my Learning Tools folder. In this folder, I put apps that I think will work with any subject area.

The first app is called Compare-a-Twist. This app allows students to categorize different topics. There are some lessons already on the app, like Fruits or Vegetables. Or you (or your students) can create your own lessons. The screen shot below is a sample of a lesson that I made after I taught students about Isabel Beck's theory on the Tiers of Vocabulary. You can choose the pinwheel shape or a tornado. The student will drag and drop the words to the correct pinwheel.

At the end of the lesson, the teacher can see the student's score. This app makes a great "checking for understanding" app. I would like to see the ability to have students log-in and save their scores. Another nice feature of the app is that you can import lessons from google docs and upload lessons you create on the app to your google docs account.

The next app in the Learning Tools folder is Flashcards+. This would be a great app for a student to have on their own iPad. It allows for the creation of multiple decks of flashcards. It does crash on me every so often. and it has a feature called flashcloud that allows the user to sync decks of flashcards across all devices, as well as on a website called Course Hero. This feature is only available with purchase, and I have not purchased it, so I cannot comment on how well it works. This is an app that hasn't gotten much use from me, but I can definitely see the value for students or on school-owned devices.
I keep my Dictionary app in the Learning Tools folder. This is The Free Dictionary from Farlex. It allows the used to look up words in many languages. Dictionaries can be downloaded for use in offline mode, but there are other features that can be used when the device is connected to wifi. The main page when connected shows a word of the day, article of the day, quote of the day, this day in history, weather, in the news, and several games such as hangman and spelling bee (one that I can waste a significant amount of time playing!)
The next app, SAT Vocab Master, is one that I downloaded for my high school aged daughter. I don't know if she's used it yet, but I have fun playing with it from time to time. The app has 7 decks of SAT vocab flashcards. For each word, you guess the definition, then flip the card to check your definition against the actual one. At the bottom, is a 1-4 scale to rate how well you know the word. You can check your stats, reset them, and connect with the app makers on twitter and facebook.

Constructed Meaning is the next app in my folder. I love this app, but it is one that is meant for students to use. As my iPad is my own personal one, I have not had students try the app. It is an ELA based app that allows students to work with the concepts and vocabulary of English language arts. The screen shot above is of the home screen after student log-in.You can add all of the students in your class. They log-in to use the app and you can track their progress through the app.
 |
| This is the Word Bank page. It shows which concepts the logged-in student has mastered, which they are exploring, and which concepts the student has yet to discover. |
 |
| This screen shot shows the Word Quest page. It is a series of multiple choice questions about the concepts.Students have the option of having the app read to them as well. |
Writer List is a great app for writers or aspiring writers. It contains a multitude of lists for authors to consult. From character names (male and female, first names and last names) to occupations (circus performer, ditchdigger, insurance salesman) to body type (doughy, strapping, voluptuous, willowy), you can create any character. Want to explore their personality? You can find lists for phobias, obsessions, hobbies, and emotions. There are lists for plot dimensions (conflicts, issues, dramatic situations.) Can't decide where your story should take place? How about lists for U.S cities, world cities, landforms and weather. Then there are miscellaneous lists such as animals (general and domesticated), colors, foods, and vehicles. And you can put your story all together with help from the Words lists: action verbs, dialog verbs, nouns, adjectives, rhyming words, etc. When you find something in a list that you don't want to forget, you can favorite it and save it to your own list. I love this app!

The last app in this folder is called Qwiki. It has photo-videos on so many topics! You can find general topics like democracy or weather. You can search your own topics and find things close to home (I found videos on the counties in my state) or far away like Machu Picchu. Each time you view a Qwiki, it gives you options to view other similar Qwikis. I've "wasted" plenty of time on this app and I think that kids would have fun exploring new things as well.
 |
| This is the Qwiki on weather. |
 |
| The menu at the top has the option to view Qwikis on News, Location, Popular Qwikis, Actors, Cities, Natural Wonders, and Monuments. This is the page on monuments. |
 |
| A Qwiki on Democracy. |
Tuesday, November 20, 2012
Sharing our anchor charts
In my last post, I described the process that my Intervention classes used to review nonfiction text features, to create anchor charts, and to peer assess the charts against the criteria we had established together. In order to make this project relevant to the students, I had informed them ahead of time that their charts would be displayed both in our middle school building and in our elementary building. In this way, other students would be able to review text features when it became necessary.
The students decided which anchor charts would go to the elementary building during the peer assessment process. In addition to leaving feedback, the students chose the three anchor charts that best met the criteria. This morning, the creators of the "winning" charts delivered their work. The small groups lined the main hallway and the elementary literacy paraprofessionals (there are 12 in the building) matched up with a group and listened to the group explain their anchor chart. The paraprofessionals asked questions for clarification and to get the students to think deeper. After their presentation, the groups gave their anchor charts to the paraprofessionals. They, along with our elementary literacy coach, will decide where to display the charts throughout the elementary building.
It was so fun to see how excited the students were to share their work, as well as a little nervous about saying the "right thing." But they all did a spectacular job, as you can see from the photos below. :)
 |
| 6th grade group |
 |
| 8th grade group |
 |
| 6th grade group |
 |
| 7th grade group |
 |
| 7th grade group |
 |
| 7th grade group |
 |
| 6th grade group |
 |
| 7th grade group |
Tuesday, November 13, 2012
Text Feature Anchor Charts
So I'm taking a break from my iPad app posts to show you what's been happening in our Intervention classrooms. A couple of weeks ago, my classes of 6th, 7th, and 8th graders began reviewing nonfiction text features. A pretest showed me that they were pretty comfortable with most of the features, but there were a couple that were tripping them up.
I found a nice power point online. Do you get as excited as I when you don't have to reinvent the wheel? I love that so many teachers are sharing their ideas and talents! So I shared the power point with each class. We discussed each text feature and the students did some note taking. Then I showed the classes a couple of pictures of text feature anchor charts I found. Using these as exemplars, they came up with criteria for what a good anchor chart would include and how it would look.
Once they had an understanding of what would be quality work, I set them loose. I brought in magazines and old text books and they went through them searching for text features, cutting them out, and checking them off their lists. I had all students searching for all text features because I wanted to make sure they were each thinking about all the features.
After a couple of days of looking, the students had found all they needed. At this point, I put them into groups of 3, but they had been bugging me to make their own groups. I worry about letting them do this because it always seems there are one or two students that nobody wants to work with. But all my classes have been getting along so well, I decided to give it a shot. So I told them they would have 2 minutes to quietly and politely create their own groups. If at the end of 2 minutes, they were not ALL in groups, they would have to use the groups I put together. All three grades were able to create their own groups so quickly with nobody left out. And I only had one group in all three classes that didn't really work very well. My 6th graders amaze me every day with their maturity. They managed to get into groups with 1:20 left on the clock!
Now that they were in groups, it was time to put their anchor charts together. With three in the group, their first step was to sort all the text features they had found individually to decide on the best example for each text feature. It took the groups three days to get their anchor charts done. I had told them that we would pick the best three from each grade to take to the elementary so the teachers there could use them. That relevancy really upped their motivation! Below are the best charts for each grade level:
As each group worked on their chart, they were continually evaluating it against our criteria to make sure they were doing their best work. I decided when they were done, I needed to do something more with them. So we had a Gallery Walk at each grade level. The groups went around looking at the anchor charts, evaluating them against the criteria and leaving feedback on sticky notes on each poster. Each group had to leave one sticky note of something they felt was done well on the poster and one sticky note suggesting a way the poster could have been better. Once again, my 6th graders impressed me with how seriously they took to their task.
In a couple of days, I will have all the students take the post test. I'm excited to see how much they have retained about text features. Thanks for reading...I will leave you with some delightful pictures of my students diligently giving feedback. :)
I found a nice power point online. Do you get as excited as I when you don't have to reinvent the wheel? I love that so many teachers are sharing their ideas and talents! So I shared the power point with each class. We discussed each text feature and the students did some note taking. Then I showed the classes a couple of pictures of text feature anchor charts I found. Using these as exemplars, they came up with criteria for what a good anchor chart would include and how it would look.
Once they had an understanding of what would be quality work, I set them loose. I brought in magazines and old text books and they went through them searching for text features, cutting them out, and checking them off their lists. I had all students searching for all text features because I wanted to make sure they were each thinking about all the features.
After a couple of days of looking, the students had found all they needed. At this point, I put them into groups of 3, but they had been bugging me to make their own groups. I worry about letting them do this because it always seems there are one or two students that nobody wants to work with. But all my classes have been getting along so well, I decided to give it a shot. So I told them they would have 2 minutes to quietly and politely create their own groups. If at the end of 2 minutes, they were not ALL in groups, they would have to use the groups I put together. All three grades were able to create their own groups so quickly with nobody left out. And I only had one group in all three classes that didn't really work very well. My 6th graders amaze me every day with their maturity. They managed to get into groups with 1:20 left on the clock!
Now that they were in groups, it was time to put their anchor charts together. With three in the group, their first step was to sort all the text features they had found individually to decide on the best example for each text feature. It took the groups three days to get their anchor charts done. I had told them that we would pick the best three from each grade to take to the elementary so the teachers there could use them. That relevancy really upped their motivation! Below are the best charts for each grade level:
 |
| 8th Grade |
 |
| 6th Grade |
 |
| 7th Grade |
In a couple of days, I will have all the students take the post test. I'm excited to see how much they have retained about text features. Thanks for reading...I will leave you with some delightful pictures of my students diligently giving feedback. :)
 |
| 7th graders analyze their classmates' chart. |
 |
| 6th graders..."Yea, you're right, they did find a good map!" |
 |
| 6th graders filling out their sticky note. |
 |
| My all boy groups always make me a little nervous, but these guys were phenomenal! |
 |
| "Look how eye-catching their picture is!" |
 |
| 6th graders on the move! |
 |
| 7th graders deep in discussion. |
 |
| 6th graders..."What do you think they did well?" |
Thursday, November 8, 2012
Productivity Apps
As promised yesterday, the second folder of apps I will share is my Productivity apps. I do have some apps in here that I don't use very frequently. If you use them more than I do, please feel free to share ideas in the comments.
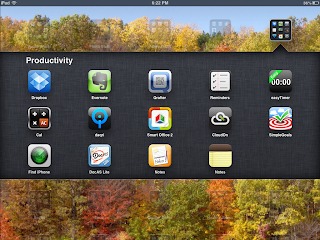 Dropbox is the one app I use on an almost daily basis. This is an app that allows you to store documents in the cloud. You can install dropbox on all your devices and have access to all your files wherever you are. You can also use dropbox on the web if you are on a device that is not your own. Dropbox also allows sharing of folders. This has been very handy for my teachers when I have to share files with them.
I know that I don't utilize Evernote to its full capacity. It is a great app for saving documents, pictures, etc. I have created a folder in Evernote for each of my students and I take pictures of their work to upload to their folders in Evernote. If you are interested in this app, you should really take the time to watch the bunches of YouTube videos that people have posted about how to use it to its full potential.
Qrafter is QR code reader and creator. I don't do much with QR codes, but it's important for me to have a code reader on my iPad since I downgraded my phone from an Android smart phone to a regular old dumb phone. And there are SO MANY ideas out there for using QR codes in the classroom. If you have good access to technology and wifi at your school, you should definitely look in to using QR codes.
So Reminders comes standard on the iPad. I don't really use it, though I've tried. I can never seem to get the reminders to actually notify and remind me of anything. I would love some ideas about how to make this app work better.
easyTimer is a timer and stopwatch app. This comes in handy to stick under the document camera when you give students a time limit for activities. You tap it to make it start and stop and it isn't always receptive to your tap. It probably isn't the best timer app, but it's free. If you know of a better one, please share in the comments.
Everyone needs a calculator at some point. This one, called calculator+ works well for me. It has some of the scientific buttons which I never use, but I figure one day one of my daughters might need it.
Daqri is another QR code reader. I haven't used it in a while. I just opened it up to so that I could explain it better and now I can't even figure out how to make it scan the codes! I think I will be deleting this app!
Smart Office 2 and CloudOn are both apps that let you create Microsoft Office documents. You can also access documents you have saved in Dropbox and edit them. I was lucky enough to pick up Smart Office 2 when it was offered for free, but it now costs $9.99. CloudOn is free and has good ratings, so I'd recommend starting with that one if you are in the market for a document app.
Simple Goals is just a fun little app that allows you to set any kind of goals you wish and then monitor them. It isn't a magic bullet that will make you actually achieve your goals. Unfortunately, you still have to do the hard work. Maybe that's why I don't use this app very often. :)
Find iPhone is an app you may have seen demonstrated on ABC World News. When you lose your iPhone or iPad, you can log in to the Find iPhone app from a friend's device and put your device into lost mode. This will help you locate your device as well as keep anyone who finds it from accessing your personal information.
DocAS Lite is an app that allows you to open documents like pdf files and annotate them. I downloaded this app because I read many pdf documents. Because I like to highlight and annotate what I read for work, I was finding that I was printing off a lot of documents. This app will allow me to read and annotate on the iPad. In looking it over today, it looks like after a couple of trial uses, I'll have to pay for the app. But if it works well, I won't mind doing that.
The last two apps in my Productivity folder are notes apps. The second is the native notes app, which I use a lot. The first one is called Notes from Paperport. I downloaded this one because I wanted the option of using my finger to take notes. Then I found it to be very hard to do so I have ordered a stylus and I'm hoping that will make this Notes app a bit easier to use.
There you have it; that's my Productivity folder. Once again, feel free to share in the comments any great apps I am missing!
Wednesday, November 7, 2012
I'm back! With the start of a new series of posts...
June? Has it really been since June that I have written a new blog post? Well, since I am not participating in Nanowrimo this year, I am making it a goal to get back to blogging.
The beginning of this new school year has been crazy. The middle school (grades 6-8) has made its way over to the high school building and we are nestled snugly on the second floor. I am juggling several roles: literacy coach, intervention teacher, statewide formative assessment presenter as well as formative assessment coach to my local middle school team, not to mention mom, chauffeur, and chief cook and bottle washer at home. (Thank goodness there aren't really any bottles to wash!)
So in the near future, I'll be blogging a bit about all those things. But first, I am planning a series of posts about the multitude of apps I have on my iPad! I know there are all sorts of resources out there to find good apps, but maybe there will be something here you haven't seen before. And if you have one that I am missing, please share it in the comments!
Today's post will focus on the folder of apps that I call Teacher Tools.
 Pictured above are the apps in my Teacher Tools folder. Some of them probably don't need much explanation, but I'll give a brief overview of each. For more information, you can visit the app store.
Educreations, ShowMe (in the first row) and ScreenChomp (third app in last row) are three similar apps. They all have a virtual recordable whiteboard for a teacher to record a simple lesson and upload for students to view. Between the three apps, there are capacities for sending the lessons out in email or embedding them in a website or blog. ShowMe also has the option to create student accounts...what a great way for students to show what they know!
CommonCore from Mastery Connect and EZLACore are both apps that give you quick access to the Common Core State Standards in math and ELA. (Though you'll have to find the EZMathCore app for the math standards.) I use these ones all the time. They also include the appendices of the CCSS documents. EZLACore allows the user to take notes for each standard and to email those notes.
The last app on the first row is the Classroom Organizer from Book Source. I love this app, I just wish I could take full advantage of it. This app allows the user to scan the bar codes of books to digitize the classroom library. Then it can be used as a system for students to check those books out. I have been frustrated for years about the best way to manage my classroom library and this would be so awesome...except you need wireless internet for the scanning tool to work with your iPad, iPod, cell phone, etc. And can you believe in this day and age, my building does not have wireless internet? Even just for teachers. Feel free to commiserate with me if you are in the same boat!
I'm sure iTunes U doesn't need any explanation. If you don't know what it is, go check it out NOW! Seriously, I'll wait...
The next two apps in the second row can be used for the same purposes: Confer Lite and Teacher's Assistant Lite. These two apps would be fabulous to use if you are a classroom teacher that incorporates the formative assessment process and you've been pulling your hair out trying to find a way to manage the evidence of student learning you get from observations and conferences. With these apps, you can import or add student names and use your iPad to keep your notes. Confer Lite allows you to create student groups and flag important notes. Your notes can also be shared wirelessly or sent in email. Teacher's Assistant Lite has a couple of features that Confer Lite doesn't. Teacher's Assistant has the capability of sending out bulk emails and it has a Randomizer to use in creating groups. It has an email feature as well as links to video tutorials to help you figure out how to use it. I have to admit that I haven't used either of these apps very extensively, so I am not sure yet which one I prefer.
The Skyward app is for our school's data system, so unless your building/district uses Skyward, you probably wouldn't find much use in it. The last app in the second row is a link to Planbook.com. This online lesson plan book has a yearly cost of $12, but I think it is well worth it. And you can get price reductions if several people in your building use it. What I love the most is the ease of indicating which CCSS each lesson is addressing. I use the My List feature to keep track of the students' learning targets.
The first app in the third row is Socrative. This is an app that can take the place of a clicker system in the classroom if students have cell phones with texting features. Once again, I think this app has great power and potential for me. But without wireless, and being in a high poverty, rural district where the majority of students do not have cell phones, it is not an app that I use.
OMJS Structures and Scholastic's Classroom Ideas To Go are two apps that give you quick ideas for activities in the classroom. OMJS has learning structures organized around the concepts of Orientation strategies, Acquire/Consolidate strategies, Reflective/Evaluative strategies, and strategies to Get Acquainted. You can select strategies based on the amount of time you have and then by how you want to group students: Individual, Pair, Foursome, Class.
In Scholastic's Classroom Ideas To Go, you set three categories and then "spin the wheel" to see a strategy. The categories are Grade (choose from spans: K-2, 3-5, 6-8, or all), Subject (math, science, language arts, social studies, the arts, life skills, classroom management, or all), and Type (group work, circle time, active, quiet, games,test prep, first weeks, fall, winter, spring, summer, outdoors, crafts, tech, decor, or all.) You can favorite the ones you really like to come back to later or search by terms as well.
Teacher Sounds by Javoid is a fun little sound board. Below is a picture to show you the different sounds the app has.

PickMe! is the last app pictured in the third row. With this app, you can import your class roster using Dropbox or manually input it. The app then allows you to randomly call on students. That is really its only function, so I haven't actually used it yet! Sometimes the old tried-and-true methods like names on popsicle sticks work just as well. But kids love the technical aspect of it!
Edmodo, in the bottom row, is a site for teachers to set up interactions with their classes that is similar to Facebook. It's another great way to cash in on our students' love of technology. Edmodo is web based as well as being an app, so students can also access it through iPods or the web via computer. Edmodo allows teachers to upload assignments and to create groups.
The last app in my Teacher Tools folder is Fluency Timer Free. I use this app to take monthly running records of my reading intervention students. The app records and times 1 minute of reading. The readings can then be sent to my email. I would love if the app developer would add the ability to save to my Evernote...then I could create a folder for each student and save their recordings for the whole year in their evernote folder and share them with parents.
There you have it! Please leave a comment if I have turned you on to an app that is new to you, or if you have a teacher tool app to share! And stay tuned next for all the apps in my Productivity folder!
The beginning of this new school year has been crazy. The middle school (grades 6-8) has made its way over to the high school building and we are nestled snugly on the second floor. I am juggling several roles: literacy coach, intervention teacher, statewide formative assessment presenter as well as formative assessment coach to my local middle school team, not to mention mom, chauffeur, and chief cook and bottle washer at home. (Thank goodness there aren't really any bottles to wash!)
So in the near future, I'll be blogging a bit about all those things. But first, I am planning a series of posts about the multitude of apps I have on my iPad! I know there are all sorts of resources out there to find good apps, but maybe there will be something here you haven't seen before. And if you have one that I am missing, please share it in the comments!
Today's post will focus on the folder of apps that I call Teacher Tools.

Educreations, ShowMe (in the first row) and ScreenChomp (third app in last row) are three similar apps. They all have a virtual recordable whiteboard for a teacher to record a simple lesson and upload for students to view. Between the three apps, there are capacities for sending the lessons out in email or embedding them in a website or blog. ShowMe also has the option to create student accounts...what a great way for students to show what they know!
CommonCore from Mastery Connect and EZLACore are both apps that give you quick access to the Common Core State Standards in math and ELA. (Though you'll have to find the EZMathCore app for the math standards.) I use these ones all the time. They also include the appendices of the CCSS documents. EZLACore allows the user to take notes for each standard and to email those notes.
The last app on the first row is the Classroom Organizer from Book Source. I love this app, I just wish I could take full advantage of it. This app allows the user to scan the bar codes of books to digitize the classroom library. Then it can be used as a system for students to check those books out. I have been frustrated for years about the best way to manage my classroom library and this would be so awesome...except you need wireless internet for the scanning tool to work with your iPad, iPod, cell phone, etc. And can you believe in this day and age, my building does not have wireless internet? Even just for teachers. Feel free to commiserate with me if you are in the same boat!
I'm sure iTunes U doesn't need any explanation. If you don't know what it is, go check it out NOW! Seriously, I'll wait...
The next two apps in the second row can be used for the same purposes: Confer Lite and Teacher's Assistant Lite. These two apps would be fabulous to use if you are a classroom teacher that incorporates the formative assessment process and you've been pulling your hair out trying to find a way to manage the evidence of student learning you get from observations and conferences. With these apps, you can import or add student names and use your iPad to keep your notes. Confer Lite allows you to create student groups and flag important notes. Your notes can also be shared wirelessly or sent in email. Teacher's Assistant Lite has a couple of features that Confer Lite doesn't. Teacher's Assistant has the capability of sending out bulk emails and it has a Randomizer to use in creating groups. It has an email feature as well as links to video tutorials to help you figure out how to use it. I have to admit that I haven't used either of these apps very extensively, so I am not sure yet which one I prefer.
The Skyward app is for our school's data system, so unless your building/district uses Skyward, you probably wouldn't find much use in it. The last app in the second row is a link to Planbook.com. This online lesson plan book has a yearly cost of $12, but I think it is well worth it. And you can get price reductions if several people in your building use it. What I love the most is the ease of indicating which CCSS each lesson is addressing. I use the My List feature to keep track of the students' learning targets.
 | |
| This view shows the standards in drop down. Just select the ones your lesson covers! |
 |
| This view shows a couple of the learning targets I created to make the standards more friendly to students. |
The first app in the third row is Socrative. This is an app that can take the place of a clicker system in the classroom if students have cell phones with texting features. Once again, I think this app has great power and potential for me. But without wireless, and being in a high poverty, rural district where the majority of students do not have cell phones, it is not an app that I use.
OMJS Structures and Scholastic's Classroom Ideas To Go are two apps that give you quick ideas for activities in the classroom. OMJS has learning structures organized around the concepts of Orientation strategies, Acquire/Consolidate strategies, Reflective/Evaluative strategies, and strategies to Get Acquainted. You can select strategies based on the amount of time you have and then by how you want to group students: Individual, Pair, Foursome, Class.
In Scholastic's Classroom Ideas To Go, you set three categories and then "spin the wheel" to see a strategy. The categories are Grade (choose from spans: K-2, 3-5, 6-8, or all), Subject (math, science, language arts, social studies, the arts, life skills, classroom management, or all), and Type (group work, circle time, active, quiet, games,test prep, first weeks, fall, winter, spring, summer, outdoors, crafts, tech, decor, or all.) You can favorite the ones you really like to come back to later or search by terms as well.
Teacher Sounds by Javoid is a fun little sound board. Below is a picture to show you the different sounds the app has.

PickMe! is the last app pictured in the third row. With this app, you can import your class roster using Dropbox or manually input it. The app then allows you to randomly call on students. That is really its only function, so I haven't actually used it yet! Sometimes the old tried-and-true methods like names on popsicle sticks work just as well. But kids love the technical aspect of it!
Edmodo, in the bottom row, is a site for teachers to set up interactions with their classes that is similar to Facebook. It's another great way to cash in on our students' love of technology. Edmodo is web based as well as being an app, so students can also access it through iPods or the web via computer. Edmodo allows teachers to upload assignments and to create groups.
The last app in my Teacher Tools folder is Fluency Timer Free. I use this app to take monthly running records of my reading intervention students. The app records and times 1 minute of reading. The readings can then be sent to my email. I would love if the app developer would add the ability to save to my Evernote...then I could create a folder for each student and save their recordings for the whole year in their evernote folder and share them with parents.
There you have it! Please leave a comment if I have turned you on to an app that is new to you, or if you have a teacher tool app to share! And stay tuned next for all the apps in my Productivity folder!
Subscribe to:
Posts (Atom)